If you’ve ever spotted that fluffy, raised lettering on a varsity jacket and thought How do they make that?’, you’ve already noticed chenille patches in the wild. From Auckland sports clubs to Wellington school leavers, from Christchurch dance studios to Dunedin university teams, chenille patches have been the go-to choice for anyone who wants their garment to carry a real, tactile sense of identity.
In this complete guide, Embroidery Patch NZ breaks down everything: what chenille patches are, how they’re made, the different types available, how to apply them, where to buy them in New Zealand, and how to design your own, including custom chenille patches with no minimum order.
What Are Chenille Patches?
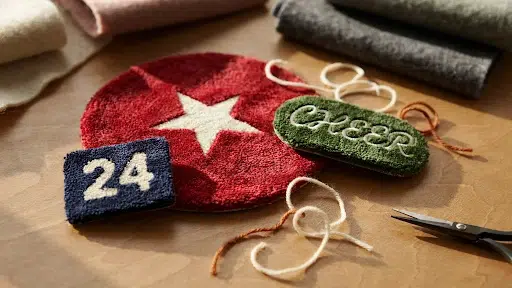
Chenille patches are embellishments made from chenille yarn, a type of yarn characterised by its short, fuzzy pile fibres that stick out perpendicularly from the core thread, creating a soft, caterpillar-like texture. (The word ‘chenille’ comes from the French word for caterpillar.)
When chenille yarn is tufted or stitched into a felt, wool, or twill backing in a specific shape or pattern, the result is a patch with a distinctively raised, velvety surface. Run your hand over a chenille patch, and it feels almost like velvet, soft, plush, and dimensional.
They have been a staple of American varsity culture since the early 20th century and are now widely used across schools, sports teams, music groups, clubs, and streetwear brands globally, including right here in New Zealand.
Key Characteristics of Chenille Patches
| Feature | Detail |
|---|---|
| Material | Chenille yarn (acrylic, wool, or cotton blend) tufted into felt/twill |
| Texture | Raised, plush, velvety, distinctly 3D |
| Common shapes | Letters, numbers, logos, animals, crests, abstract shapes |
| Typical size | 5 cm – 30+ cm (letter patches avg. 8–12 cm tall) |
| Attachment methods | Sew-on, iron-on (heat-activated glue), Velcro |
| Best used on | Varsity jackets, hoodies, bags, hats, team jerseys |
| Durability | High, yarn pile resists abrasion; backing holds firm with correct attachment |
| Customisation | Full colour, shape, size, fully bespoke available |
How Are Chenille Patches Made?
Understanding how chenille patches are manufactured helps you appreciate the quality difference between machine-produced and hand-made versions, and why professional suppliers like Embroidery Patch NZ produce a finished product that far outlasts DIY alternatives.
The Professional Manufacturing Process
- Design & digitisation — Your artwork is converted into a tufting programme. The design is mapped out so the chenille machine knows exactly where to place each yarn tuft.
- Base fabric cutting — A felt, wool, or heavy twill backing is cut to the patch’s outline shape (or slightly larger for a border).
- Chenille yarn tufting — A specialised chenille tufting machine drives loops of chenille yarn through the backing at precise intervals, creating the raised pile. Different colour yarns are loaded to match the design.
- Pile trimming & finishing — The yarn loops are trimmed to a consistent height for a uniform, velvet-like surface. On premium patches the pile is hand-finished for evenness.
- Border stitching (merrow or tackle-twill) — A merrowed (overlock-stitched) border or an appliqued tackle-twill border is added around the perimeter to seal raw edges and give a clean outline.
- Backing application — Depending on the order spec, a heat-activated adhesive (iron-on), sew-on backing, or Velcro loop backing is added to the reverse side.
- Quality control & packaging — Each patch is inspected for pile consistency, colour accuracy, and backing integrity before dispatch.
How Are Chenille Patches Made By Hand? (DIY Method)
If you want to make chenille patches at home, perhaps for a one-off personal project or craft experiment, it’s possible, though time-intensive. For high-quality or bulk results, professional production always wins. Here’s the hand method (see also our detailed guide on how to make embroidered patches for a broader patch-making context):
Materials needed for DIY chenille patches:
- Felt backing (heavy wool felt works best)
- Chenille yarn or chenille needles & thin yarn
- Embroidery hoop
- Transfer paper and a design template
- Sharp scissors
- Fabric glue or iron-on adhesive sheet
- Pen or chalk for tracing
Step-by-step DIY process:
- Trace your design onto the felt using transfer paper.
- Secure the felt in the embroidery hoop.
- Thread your chenille needle with chenille yarn.
- Push the needle through the felt from the back, leaving a yarn loop on the front surface.
- Repeat in tight rows following the outline of your design, working row by row until the shape is filled.
- Once filled, trim the loops to an even height with sharp scissors to create the pile.
- Cut around the patch outline, leaving a small seam allowance.
- Seal the edges with fabric glue or attach iron-on adhesive to the back for iron-on application.
Honest assessment: Hand-made chenille patches work well for small hobby projects, but are difficult to scale, and achieving consistent pile height and clean borders by hand is genuinely hard. For anything wearable or presentable, especially letters or detailed logos, professional production gives far superior results.
Types of Chenille Patches
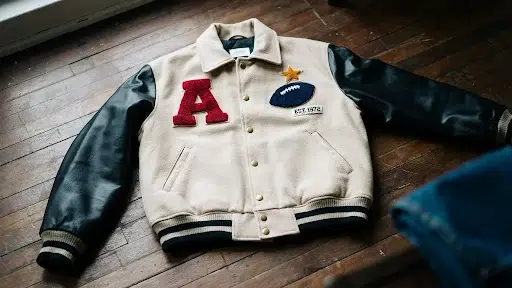
Chenille patches come in a wide variety of styles. Knowing the different types helps you pick the right patch for your garment or project.
By Shape & Design
| Type | Description | Most Popular Use |
|---|---|---|
| Chenille letter patches | Individual alphabet letters in a chenille pile, the classic varsity look | Varsity jackets, hoodies, team kits |
| Chenille number patches | Numerals 0–9, often matched with letter sets | Jersey numbers, graduation years |
| Chenille logo patches | Custom brand or team logos recreated in chenille yarn | Sports clubs, school crests, brand merch |
| Chenille shape patches | Animals, crests, shields, stars, and abstract shapes | Awards, event patches, costume |
| Chenille name patches | Full names spelt out in chenille letters | Personalised jackets, team uniforms |
| Chenille mascot patches | School or team mascots, eagles, kiwis, lions, etc. | School leavers, team spirit wear |
By Attachment Method
| Backing Type | How It Works | Best For |
|---|---|---|
| Sew-on | Stitched directly to garment, most permanent and durable | Jackets, denim, thick fabrics |
| Iron-on (chenille iron on patches) | Heat-activated adhesive on reverse; bond is activated with an iron or heat press | Cotton/poly blends, quick application |
| Velcro-backed | Hook-and-loop backing allows removable attachment | Bags, tactical gear, reusable applications |
| Peel-and-stick | Temporary pressure-sensitive adhesive | Displays, events, sampling only, not wash-safe |
By Style
Varsity chenille patches
The most iconic style, thick felt backing with merrowed borders, bold chenille lettering in team colours. These are the patches that defined the American varsity jacket look and are now equally popular across NZ schools and sports clubs.
Letterman Chenille patches
Closely related to varsity patches, letterman patches specifically refer to the award-style letter (an ‘A’, ‘W’, or school initial) earned by student athletes. They’re typically large, 10–20 cm, and produced in school or team colours.
Large chenille patches
Oversized chenille patches (15 cm and up) are used as centrepiece patches on varsity jackets, work wear, and bags. They make a strong visual statement, and the plush pile texture looks especially luxurious at larger scales.
Chenille embroidery patches (hybrid style)
A hybrid format where a chenille pile fill is combined with embroidery thread details, giving you the softness of chenille with the fine-line precision of embroidery. These are popular for complex logos. See also our custom embroidered patches for pure embroidery options.
Chenille Patches vs Other Patch Types: Which Should You Choose?
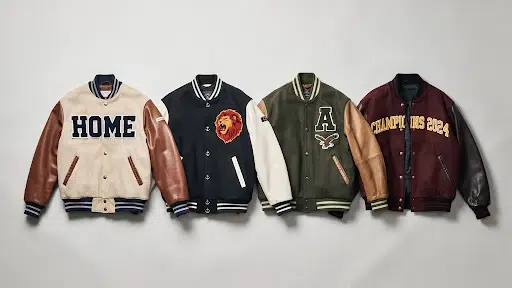
Following is the best custom patches in New Zealand breakdown:
| Patch Type | Texture & Look | Detail Level | Durability | Best For | Cost Range |
|---|---|---|---|---|---|
| Chenille | Plush, raised, velvety pile | Low–Medium (bold shapes, text) | High | Varsity, sports, streetwear | $$–$$$ |
| Embroidered | Flat to slightly raised thread | High (fine lines, gradients) | Very high | Logos, crests, uniforms | $$ |
| Woven | Flat, fabric-like surface | Very high | High | Text-heavy, fine detail | $–$$ |
| PVC / rubber | 3D moulded rubber | High (moulded relief) | Very high | Tactical, outdoor, workwear | $$–$$$ |
| Sublimated | Fully flat, photo-quality print | Photographic | Medium | Full-colour photographic designs | $–$$ |
| Leather | Flat, premium leather surface | Medium | Very high | Premium brands, biker patches | $$$ |
| Applique | Layered fabric, slight texture | Medium | High | Large areas, two-tone designs | $$ |
What Can You Put Chenille Patches On?
Chenille patches are versatile, here are the most popular garments and accessories they work on, along with any fabric considerations.
Chenille Patches on Hoodies
Chenille patches on hoodies are enormously popular right now, driven by the streetwear resurgence of varsity aesthetics. A chenille letter patch or logo patch on the chest or back of a hoodie instantly elevates a plain garment. For hoodies, iron-on chenille patches work well on cotton-poly fleece, but reinforcing with a few anchor stitches is always recommended for wash longevity.
Chenille Patches on Varsity & Letterman Jackets
The original and still the most popular application. Wool varsity jacket bodies hold chenille patches exceptionally well, the thick fabric grips iron-on adhesive firmly, and the weight of the jacket means the patch lies flat. Sewing is still the gold standard for jacket patches due to the garment’s long-term value.
Chenille Patches on Bags & Backpacks
Tote bags, backpacks, duffel bags, and chenille patches add a personalised touch to any carry item. On bags, Velcro-backed patches offer the flexibility to swap patches between bags. Iron-on works well on canvas and heavy cotton bag fabrics.
Chenille Patches on Hats & Caps
Smaller chenille patches (under 8 cm) work on baseball caps, beanies, and bucket hats, typically positioned on the front panel. Given the curved surface, sewing is strongly preferred over ironing for hats, as the iron can’t apply even pressure on a curved surface. Explore our custom sports patches range for team hat patch options.
Other Compatible Items
- Denim jackets and jeans
- School uniforms and blazers
- Sports jerseys and team kits
- Dance and performance costumes
- Scout and guide uniforms
- Motorcycle club vests
Fabric Compatibility Quick Reference
| Fabric Type | Iron-On Safe? | Sew-On Safe? | Notes |
|---|---|---|---|
| Cotton / cotton-poly blend | Yes | Yes | Ideal for both methods |
| Wool/wool blend | Yes (medium heat) | Yes | Use a press cloth; great for varsity jackets |
| Denim | Yes | Yes | Pre-wash denim before ironing |
| Fleece / polar fleece | Caution | Yes | Fleece can melt, use low heat or sew-on |
| Nylon/polyester (thin) | No | Yes | Heat melts synthetic fibres, always sew |
| Leather / faux leather | No | Yes (with care) | Sew with a leather needle; avoid heat |
| Silk/satin | No | Yes | Delicate fabrics, hand-stitched only |
How to Apply Chenille Patches
Method A: How to Apply Chenille Patches with an Iron (Iron-On Method)
Iron-on patches are easy because they have a heat-activated adhesive layer on the back. When heat is applied, the glue melts and bonds the patch to the fabric. This is the fastest application method.
What you’ll need:
- Household iron (or heat press for bulk/professional applications)
- A thin cotton press cloth or tea towel
- Flat, heat-safe ironing surface
Step-by-step:
- Pre-heat your iron to the cotton/medium-high setting (no steam).
- Pre-heat the garment area where the patch will go, and iron over the spot for 10 seconds to remove moisture.
- Position the patch face-up on the garment.
- Place the press cloth over the patch.
- Apply firm, direct downward pressure with the iron for 25–30 seconds. Do not slide the iron.
- Lift the iron, let the patch cool for 30 seconds, then press again from the reverse side for 15 seconds.
- Allow to cool fully before handling.
Pro tip: For maximum durability, especially on hoodies and jackets that will be washed regularly, add 4–6 anchor stitches around the patch edge after ironing. Iron-on adhesive alone can lift at the edges over repeated wash cycles.
Method B: Sewing Chenille Patches On
Sewing is the most permanent attachment method and is always recommended for high-value garments or patches that will endure heavy wear.
- Pin or tack the patch in position.
- Thread a needle with a sturdy thread that matches the patch border colour.
- Use a whipstitch or running stitch along the patch’s edge, passing through the merrowed border.
- Keep stitches evenly spaced, about 3–4 mm apart.
- Tie off and secure the thread on the inside of the garment.
For machine sewing, use a zig-zag or straight stitch around the patch perimeter. Use a denim or heavy-duty needle for thick jackets.
Method C: Velcro-Backed Chenille Patches
If your chenille patch has a Velcro hook backing, you simply need to sew or iron the loop panel (the soft side) to your garment, then press the patch on. This makes patches completely removable, ideal for team kits that may need to be transferred between garments, or for collections that you rotate.
Custom Chenille Patches NZ, Design Your Own

Whether you need a single personalised patch or a full team set, Embroidery Patch NZ produces custom chenille patches tailored exactly to your specifications, with a free design service and no hidden fees.
What You Can Customise
| Design Element | Your Options |
|---|---|
| Shape | Any shape, letters, numbers, logos, mascots, crests, custom outlines |
| Size | From 5 cm up to 30+ cm, specify in mm, cm, or inches |
| Colours | Full colour matching, we match to your brand or team colours |
| Backing | Sew-on, iron-on, Velcro, specify per order |
| Border style | Merrowed (overlock) border or tackle-twill applique border |
| Pile height | Standard or extra-deep pile for a more luxurious texture |
| Quantity | No minimum order, single patches welcome; bulk pricing from 10+ pieces |
How to Order Custom Chenille Patches from Embroidery Patch NZ
- Submit your quote request — Use the order form on our custom chenille patches page. Include your desired size, quantity, and attach your design or describe what you need.
- Free design proof — Our in-house design team creates a digital proof for your approval, typically within 24–48 hours.
- Approve and confirm — Review the proof, request any changes, then confirm your order.
- Production & quality check — Patches are produced and inspected before dispatch.
- Delivery to NZ — Fast shipping direct to your New Zealand address.
Need a quote or have a question? Contact our team here. You can also view our transparent pricing page and browse finished work in our portfolio.
Chenille Letter Patches & Varsity Patch Sets
Chenille letter patches are the single most searched-for chenille patch style, and for good reason. They’re the defining feature of varsity and letterman jackets and are widely used for personalised hoodies, team kits, and school leavers’ apparel.
Chenille Letter Patches — Key Specs
| Spec | Detail |
|---|---|
| Typical height | 8 cm – 20 cm (customisable) |
| Styles available | Block letters, serif, script/cursive, specify your preferred font |
| Colours | Single-colour or multi-colour chenille pile; contrast border options |
| Common backing | Sew-on for jackets; iron-on for hoodies and bags |
| Sets available | Full alphabet sets or individual letters, wholesale pricing on sets |
If you’re looking for iron-on letters NZ, specifically for fabric lettering, chenille iron-on letter patches are an excellent premium option that delivers far better results than print-on or heat-transfer vinyl lettering.
Wholesale & Bulk Chenille Patches
For schools, sports clubs, team uniform suppliers, custom merch businesses, and embroidery resellers, bulk chenille patch ordering offers significant savings.
Wholesale Pricing Structure (General Guide)
| Quantity | Price Guide | Notes |
|---|---|---|
| 1–9 patches | Standard single-unit rate | No minimum, single patches welcome |
| 10–49 patches | ~15–25% below single-unit | Good for small team kits |
| 50–99 patches | ~30–40% below single-unit | Mid-volume club / school runs |
| 100–499 patches | ~45–55% below single-unit | Popular for schools and uniform suppliers |
| 500+ patches | Best wholesale rate, get a custom quote | Resellers and large club runs |
Chenille Patches Pricing — What Affects the Cost?
Pricing for chenille patches varies depending on several factors. Understanding these helps you budget accurately and make informed decisions about your order.
| Cost Factor | Impact on Price | Explanation |
|---|---|---|
| Size | High | Larger patches require more yarn and production time |
| Quantity | High | Per-unit cost drops significantly with volume |
| Number of colours | Medium | Each colour change requires a yarn re-thread |
| Complexity of design | Medium | Detailed shapes take longer to tuft and finish |
| Backing type | Low–Medium | Velcro backing adds a small premium over sew-on |
| Pile depth | Low | Extra-deep pile adds marginal cost |
| Border style | Low | Merrowed vs tackle-twill borders are similar in cost |
| Rush production | Variable | Expedited orders may attract a surcharge |
Caring for Garments with Chenille Patches
Chenille patches are durable, but the plush pile requires a little care to maintain its softness and shape over time.
| Care Step | Recommendation |
|---|---|
| Washing | Machine wash cold (30°C max) on a gentle cycle |
| Detergent | Mild detergent, avoid bleach or enzyme-based cleaners |
| Washing bag | Place the garment in a mesh laundry bag to protect the pile |
| Drying | Air dry flat or on a hanger, avoid tumble dryers |
| Ironing | Do NOT iron directly over the chenille pile, it will flatten and damage the yarn |
| Brushing | After washing, gently brush the pile with a soft clothing brush to restore loft |
| Storage | Hang or fold with the patch face out, don’t compress the pile under heavy items |
Why Choose Embroidery Patch NZ for Custom Chenille Patches?
| Feature | What You Get |
|---|---|
| No minimum order | Order as few as 1 patch, ideal for personalised gifts and samples |
| Free design service | Our team creates your digital proof at no extra cost |
| 100% quality guarantee | Every patch is inspected before dispatch |
| Free shipping | Free delivery on qualifying orders to New Zealand addresses |
| All backing types | Sew-on, iron-on, Velcro, your choice |
| NZ-focused service | We understand NZ school, club, and business needs |
| Fast turnaround | Quick production and shipping timelines |
Frequently Asked Questions
What are chenille patches?
Chenille patches are textured fabric patches made from soft, looped chenille yarn tufted into a felt or twill backing. They have a raised, plush surface and are most associated with varsity jackets, team hoodies, and custom sportswear. They can be personalised with any letter, number, logo, or shape.
What is the difference between chenille patches and embroidered patches?
Embroidered patches are made from flat embroidery thread stitched onto a twill or felt base, giving a relatively flat, thread-textured surface with high design detail. Chenille patches use thick looped yarn to create a raised, velvety 3D pile, more textural but less suited to fine-line designs. For detailed logos with thin lines or gradients, custom embroidered patches are the better choice. For bold lettering, text, or tactile 3D effect, chenille wins.
How are chenille patches made?
Chenille patches are made by tufting chenille yarn through a felt or twill backing using a specialised tufting machine. The yarn loops are then trimmed to a consistent height to create the pile, a merrowed or tackle-twill border is added, and the chosen backing (iron-on, sew-on, or Velcro) is applied to the reverse side.
How to apply chenille patches?
Chenille patches are applied by: (a) iron-on method, positioning the patch on the garment and applying a hot iron over a press cloth for 25–30 seconds; (b) sewing, stitching around the patch edge with a matching thread; or (c) Velcro, pressing the hook backing onto a loop panel sewn to the garment. For best durability, reinforce iron-on patches with a few anchor stitches.
How to make chenille patches by hand?
To hand-make chenille patches: trace your design onto heavy felt; secure in an embroidery hoop; push chenille yarn through with a chenille needle row by row to fill the design; trim the loops evenly to create the pile; cut around the outline; and seal edges with fabric glue or iron-on adhesive. The results are best for simple shapes, complex designs are much better suited to professional production.
Can I iron chenille patches onto hoodies?
Yes, iron-on chenille patches bond well to cotton and cotton-poly hoodie fabrics. Use a medium-high iron setting, a press cloth, and apply firm pressure for 30 seconds. Avoid sliding the iron. For wash durability, add a few stitches around the patch edge after ironing.
Do you offer custom chenille patches with no minimum order?
Yes. Embroidery Patch NZ offers custom chenille patches with no minimum order, you can order a single personalised patch. Wholesale pricing is available for larger quantities. Contact us for a bulk quote.
What are chenille letter patches used for?
Chenille letter patches are used primarily for varsity and letterman jackets, personalised hoodies, team sports kits, school awards apparel, and streetwear. They can be ordered as individual letters or as full sets, in your choice of colours and size.
How durable are chenille patches?
Chenille patches are highly durable. The yarn pile resists normal abrasion, and a properly applied patch (especially when sewn) will outlast the garment. Wash cold on a gentle cycle and air dry to maintain the pile’s softness and prevent backing separation.
Can I get chenille patches for varsity jackets in NZ?
Absolutely. Embroidery Patch NZ specialises in custom chenille patches for varsity jackets, including chenille letter patches, number patches, mascots, and full logo patches in any size and colour. Sew-on backing is recommended for jacket applications.
Where can I buy chenille patches near me in New Zealand?
Embroidery Patch NZ offers online ordering with delivery across New Zealand, from Auckland to Invercargill.
What’s the difference between iron-on chenille patches and sew-on patches?
Iron-on chenille patches have a heat-activated adhesive backing that bonds to fabric under heat, quicker to apply but can lift at the edges over time, especially with frequent washing. Sew-on patches must be stitched to the garment, requiring more effort to apply but significantly more permanent. For jackets and high-wear items, sewing is recommended; for bags and casual hoodies, iron-on is convenient.
Can chenille patches be washed?
Yes, machine wash cold on a gentle cycle inside a mesh laundry bag. Avoid hot water, tumble drying, and ironing directly over the pile. Air dry flat to maintain patch shape and pile loft.
How long do custom chenille patches take to produce?
Production times vary by complexity and quantity, but Embroidery Patch NZ typically delivers within a few business days for standard orders.
Can you make chenille patches in NZ school or team colours?
Yes, we colour-match to your school, club, or team colours. Provide your Pantone reference, colour swatch, or simply describe the colours, and our design team will match them.
Order Your Custom Chenille Patches in New Zealand Today
Whether you need a single personalised chenille letter patch, a full varsity jacket set for your school, or wholesale chenille patches for your apparel business, Embroidery Patch NZ has you covered. We offer no minimum orders, a free design service, 100% quality guarantee, and free shipping to New Zealand addresses.