The customising culture has really caught on in Aotearoa, with more and more individuals seeking opportunities to showcase their individuality with wearable art pieces.
If you are an amateur artist in a tiny Wellington apartment or a professional artist living in Auckland, knowing everything there is to know about how to make embroidered patches can help turn what would normally be a piece of cloth into an artistic display of both raised texture and colour.
There is no denying the sense of pride and satisfaction that comes with physically possessing a badge that you made from scratch. You will not only enjoy the finished product but also the process of giving your flat design embroidery patches some depth with the right use of thread.
Understanding the Foundation of Quality Embroidery Patches
Prior to picking up a needle or machine, there is one thing you should understand about embroidery patches. High detail of a patch is determined by its stitching density and the sharpness of its edges.
In the case of the best custom embroidered patches that you can find in New Zealand now, the density of the threads is so great that you cannot see any areas of base fabric shining through, which gives the patch that luxurious metallic effect.
The very first rule you need to follow for how to make patches is never compromise on the base fabric. By choosing either twill or heavy-duty felt, you ensure that the fabric withstands all those holes that you’ll have to make in the process of stitching a highly detailed patch.
Selecting the Right Threads for Intricate Designs
In order to get professional results, the thread’s weight should always be considered. Normally, 40-weight polyester or rayon thread would be used, but in some cases where extremely fine detail work is involved, such as for tiny fonts or delicate lines, a 60 or even 75-weight thread would need to be used instead.
In terms of the personalised embroidered patches industry, this is one of the greatest secrets out there. The smaller the thread, the more detail can be crammed into a smaller space, and at the same time, this prevents the patch from looking too bulky and stiff.
Also, there is a huge difference between using polyester or rayon. Polyester is extremely durable and bleach-resistant, whereas rayon gives a better sheen to its colours.
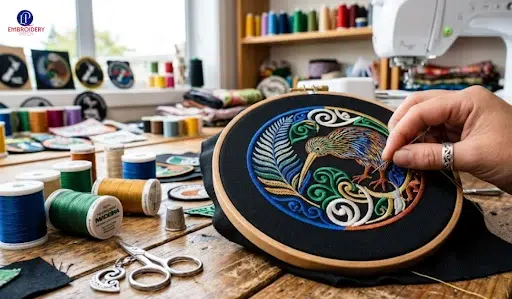
The Craft of How to Make Embroidered Patches by Hand
There is an artistic element attached to learning how to make embroidery patches by hand. Although this is definitely the longest way to go, it adds the element of soul that machines cannot always provide.
First, you would require a very solid embroidery hoop, which holds the fabric taut. If the fabric is not tight enough, the stitches will begin sagging later, spoiling the design. Hence, make sure to give due attention to it.
While learning how to make embroidered patches by hand, you would want to use stitches such as the long-and-short stitch, used for adding blended colours to large sections, and the satin stitch, for covering areas in a smooth and raised manner.
Transitioning to Automation with a Sewing Machine
However, for those who can think of many concepts but do not have much time, learning how to make embroidered patches with sewing machine is simply amazing. Most modern household sewing machines feature “free motion”, where you can draw on your fabric using your needle, much like drawing using a pen.
Embroidery techniques using sewing machine technology serve as an intermediary stage between hand embroidery and complete industrialisation. When you learn how to make embroidered patches with sewing machine, one thing that stands out is the use of stabilisers.
Stabilisers are important since you require a strong wash-away or tear-away stabiliser, owing to the thickness of the stitches used. Otherwise, the machine would devour the fabric, or the resulting patch would become curled like a dried leaf.
Designing From the Ground Up
A lot of people may be scared off by the technology aspect, but when you learn how to make embroidered patches from scratch, you will find that it begins with a simple pencil and piece of paper. Your designs need to be simplified.
Small gradients that work perfectly fine on your computer screen are not going to look so good in thread form. When you are deciding how to make embroidered patches from scratch, try thinking about your design in layers.
The first layer should be the background colour, followed by the midground detail, and finished off with a bold border that can either be satin-stitched or be known as a merrow or zigzag edge.
Creating Personalised Expressions with Lettering
Perhaps one of the most frequent requests in the NZ crafting community is for names, team names, or catchy slogans. Learning how to make embroidered letter patches needs careful attention, especially when it comes to the spacing of the letters.
This is called kerning and is very important. If the spacing is too tight, there may be bleed-through from one letter to another, creating an unrecognisable mess. When learning how to make embroidered letter patches, you must remember that when starting a new letter, you need to begin from the middle and spread out to the sides.
This way, you ensure that the text remains perfectly centred. Use a small needle, for example, a 65/9, for better results.
The Convenience of Iron-On Backings
Once your fantastic creation is ready, you have to find an attachment method, such as sewing, pinning, or glueing it to a jacket, purse, or hat. How to make embroidered patches iron on is the best choice possible, which means using a special kind of film.
This film is applied to the back of your artwork with a heat press or an ordinary iron. What makes it possible to know how to make personalised embroidered patches iron on effectively is the cooling process.
Do not even think of trying to peel the film off before cooling. When your product has cooled enough and the curing process is done, the result will be a permanent attachment of your threads to the fabric.
Achieving Professional Density and Texture
That which differentiates an amateur effort from a masterpiece is density. While researching the process of how to make embroidered patches for your uniform patches, there is one thing that pops up a lot. This is “stitch count”.
High-quality patches may require more than 10,000 stitches on their surface. For you not to break your needle doing that many stitches, there is the technique known as “underlay”.
These are stitches that are done in advance and serve as the basis for other stitching techniques to be applied to the top level of thread. It is as if you were building a house, where you lay the foundation first before erecting decorative walls.
This is how good custom embroidered patches are made. They have a premium embroidered 3D raised texture to them, which feels great to touch.
Sourcing Materials and Inspiration in New Zealand
We are blessed to have access to some amazing local wools and synthetic fabrics that could be used in making embroidery patches. Try using unusual materials when making patches.
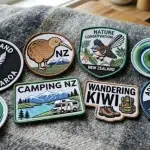
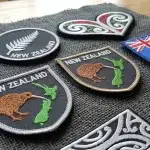
Many of the coolest personalised embroidered patches made by local artists are those that use reflective or glowing threads to give them extra sparkle or safety in case you wear them during nighttime.
If you need ideas on how to make patches, then our native flowers and animals (Tui birds) are good examples to follow for your high-detail stitching skills. If you are looking to source your patches directly to save time and hassle, we recommend ordering from a local reliable NZ custom patch provider.
The Importance of the Final Trim
Twenty hours may be spent doing the stitching work, yet if the cutting looks untidy, everything else will be of no avail. Once the stitching process of how to make embroidered patches is done, you have a piece of material that should become an individual item.
Craftsmen usually employ a hot knife or a soldering iron when dealing with man-made materials, such as polyester twill. Such treatment helps melt the fibres to make your custom embroidered patches look flawless even many years later.
Even if you drag them through the brush or put them in the washing machine. For the natural fibres, it would be a good idea to have sharp appliqué scissors handy and a bottle of fray check solution.
Refining Your Skills Through Practice
Of course, nobody achieves perfection in the first attempt at creating a detailed patch. Learning how to make embroidered patches includes many broken needles, entangled bobbins, and sometimes even the use of some curse words.
Nevertheless, with each mistake comes experience that teaches us how to control the threads’ tightness and fabric’s strength. With each attempt to learn how to make patches, you begin to develop an “intuition” regarding your materials.
You begin to understand when embroidery patches are going to be too intricate and when the chosen colour might turn out to be too dark.
Frequently Asked Questions
Can I make detailed patches without a digital embroidery machine?
Sure thing. Although machines speed up the entire process, it is possible to get fantastic results if you know how to make embroidery patches by hand. It will just take some more time and an extremely fine needle. Embroidering by hand allows for what is known as “thread painting”. This involves colour blending, which can be hard to do on a machine.
What is the best fabric to use for a long-lasting patch?
A favoured choice for made-to-order custom embroidered patches is the heavy polyester twill. It resists stretching, grips stitching tightly, and lasts through wear. Yet, should an aged, gentler appearance be desired, premium wool felt steps in. Just be careful with the wash cycle, since shrinking may occur without proper handling.
How do I prevent my patches from puckering?
The puckering effect is often caused by tight thread tension or insufficient stabilisation. In planning for how to make embroidered patches, always remember to pull your material as taut as possible into the hoop. If you are able to shift the material using your finger, then it is not tight enough. Creating a “grid” of basting stitches may also come in handy when creating filled-in embroidery designs.
Are iron-on patches as permanent as sewn-on ones?
Adhesive tapes have been highly durable, but in the case of objects that undergo heavy use, such as a backpack that you carry for your hike or a denim jacket that you wear every day, it is a good practice to add some anchoring stitches on the borders. Even if you have acquired the technique of how to make embroidered patches iron on, adding one more whip stitch on the borders will help you feel secure about your patch art.
Elevate Your Style with Embroidery Patch NZ
Learning how to make embroidered patches creates room for individual legacies. The process from sketching through heat sealing adds value to self-expression and artistry. Manual or mechanised, accuracy is key.
Choosing suitable threads, learning about stabilisers, and perfecting finishing methods give the chance to create unique custom embroidered patches. It is an expansive and colourful craft that makes it easy to start your artistic endeavours.
Having insights into details makes it easier to venture into your own masterpiece creations. Wearable art requires a blend of craftsmanship and creativity. It does not matter if it is for a beloved music group or for your company’s logo.
The quality matters a lot. For people who require professional results without having to master the skills or who need personalised embroidered patches in bulk, Embroidery Patch NZ is here to help you out. We have expertise in complicated designs and use top-notch threads and backing materials.