From garage startups in Auckland to community clubs in Christchurch, New Zealand creators are turning original artwork into wearable branding that travels everywhere their gear does. Designing your own iron-on patch is more straightforward than most people expect, and the result is something far more lasting than any printed label or digital asset.
A well-thought-out patch design does two jobs at once. It looks sharp on the garment and bonds properly to the fabric it sits on. Get the design right from the start and everything else, including production, application, and long-term wear, falls into place cleanly and confidently.
Before You Start: The Kiwi-Proof Design Rules
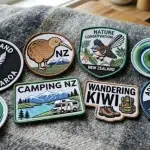
New Zealand outdoor culture puts gear through serious work. Patches that travel from Fiordland trails to Wellington wind to Northland beaches need to be designed with durability and visibility baked in from the very first sketch.
Keep It Bold and Simple
Embroidery works at a different scale from screen printing or digital design. A fine serif font that looks elegant at 12pt on a screen becomes an unreadable blur at embroidery scale. Thread has physical width, and that width sets the minimum size for any line, letter, or detail in your design.
Bold shapes, clean outlines, and simple letterforms translate into embroidery beautifully. Fine lines, drop shadows, gradients, and intricate crosshatching do not. The rule is straightforward: if you cannot draw your design clearly with a thick marker, it will not embroider cleanly either.
The Contrast Factor
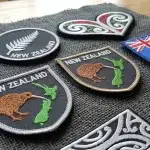
New Zealand outdoor apparel runs heavily toward denim, canvas, heavy cotton, and dark technical fabrics. A patch that blends into its background fabric disappears entirely, no matter how good the design is on its own.
High-contrast colour combinations give your patch visibility across all the surfaces it will land on. Light thread on dark backgrounds. Bright accent colours against neutral base fills. Bold outline stitching that separates the patch from the garment fabric. Design your colour palette with your target fabric colours in mind, not just with how the patch looks on a white screen.
Size Matters
A patch sized for a hat brim reads completely differently from a patch sized for a jacket back panel. Small patches, typically between 5 and 7 centimetres, suit hat fronts, shirt pockets, and sleeve positions. They need simple shapes and minimal text to stay legible at that scale.
Larger patches, from 8 to 12 centimetres and beyond, suit jacket chests, back panels, and bag surfaces where the design has room to breathe and carry more visual detail.
Match your dimensions to the location before you finalise your artwork. A design that works perfectly at 10 centimetres often needs significant simplification to read clearly at 6.
Step 1: Crafting Your Concept
Every great patch starts as a rough idea. Sketch your concept on paper first without worrying about precision. Get the basic shape, the icon or logo element, and any text placement roughed out in pencil before you open any software. Paper sketches are faster to iterate than digital files and easier to share for quick feedback from your team or club.
Once your concept is settled, move it into a digital tool for refinement. Canva works well for simple badge shapes and text-based designs where you are working with existing graphic elements. Adobe Illustrator gives you full vector control and is the preferred tool for anything with custom shapes, original icons, or complex layouts that need precise edge definition.
The goal at this stage is a clean, flat, digital version of your design that you can hand to a production team without ambiguity about colours, shapes, or proportions.
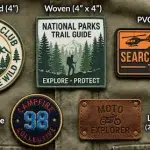
Which Patch Type Fits Your Design?
Your concept and its intended use together point directly to the right patch construction. Here is a quick comparison:
| Patch Type | Construction | Best For | Finish | NZ Condition Rating |
| Embroidered | Thread stitched into twill or felt backing | Bold logos, simple icons, 4 colours or fewer | Textured, dimensional | Excellent |
| Woven | Thread loomed into the patch structure | Fine text, complex logos, thin lines | Flat, smooth, refined | Very Good |
| PVC | Moulded rubber | Waterproof gear, surf, tactical, rain jackets | Raised, rugged | Outstanding |
Step 2: Preparing Your Artwork for Production
Production-ready artwork needs to be in vector format. Vector files, primarily SVG and high-resolution PDF formats, define shapes mathematically rather than as pixels. That means they scale to any size without any loss of edge definition or detail clarity.
A raster image, like a JPG or PNG exported from Canva at screen resolution, contains a fixed number of pixels. Scale it up for patch production and the edges blur and pixelate. A vector file of the same design scales to any patch size with perfectly sharp edges every time.
If your design currently exists only as a raster image, a graphic designer or your patch production team can vectorise it for you. Provide the highest resolution version you have and make sure every colour is clearly separated rather than blended or gradient-filled.
Step 3: Select the Right Backing
Your backing choice determines how your patch attaches to gear and how long that attachment holds under real-world use conditions.
| Type | How It Works | Best For | Key Advantage | Limitations |
| Iron-On (Heat-Seal) | Adhesive backing activates at 160–180°C and bonds to fabric when pressed with heat. | Streetwear, event merchandise, DIY use, everyday apparel. | Fast, easy application with no sewing required. | Less reliable on heavy-duty or heat-sensitive fabrics. |
| Sew-On | Patch is stitched directly into the fabric for a permanent hold. | Workwear, outdoor gear, thick fabrics like canvas or wool. | Strongest and most durable attachment. | Requires time, tools, or professional sewing. |
| Velcro (Hook & Loop) | Patch attaches to a Velcro base and can be removed or swapped easily. | Tactical gear, uniforms, outdoor and sports use. | Removable, reusable, and interchangeable. | Needs Velcro base sewn onto the garment. |
Step 4: Bringing Your Design to Life with Embroidery Patches NZ
Moving from a vector artwork file to a physical embroidered patch requires a process called digitising. A skilled digitiser takes your design file and maps out the exact stitch paths, stitch types, stitch directions, and thread colour sequences that a commercial embroidery machine follows to reproduce your design in thread.
Digitising is not automatic. The decisions a skilled digitiser makes, including where to use satin stitch versus fill stitch, how to sequence colour layers, and how to handle edge definition at your specific patch size, directly determine how sharp and durable the final patch looks.
The Local Advantage
Working with a New Zealand-based patch producer means no international shipping delays, no customs processing hold-ups, and no communication gaps across time zones. Your order stays in the country from artwork approval through to delivery, which keeps timelines predictable and quality control accessible.
For New Zealand businesses, clubs, and creators working to seasonal deadlines, event dates, or product launch schedules, local production is a practical advantage that international suppliers simply cannot match consistently.
Proofing
Before a single stitch goes into production, Embroidery Patches NZ provides a digital mockup showing exactly how your finished patch will look. Thread colours, stitch layout, border treatment, and overall proportions all appear in the proof so you can confirm every detail before committing to the full production run.
FAQs
What is the minimum order quantity for custom patches?
Minimum order quantities vary depending on patch type and size. Embroidery Patches NZ caters to small clubs and independent creators as well as larger wholesale and corporate orders.
Can I iron these on any fabric?
Iron-on patches bond well to most natural and blended fabrics including cotton, canvas, denim, and cotton-polyester blends. Pure polyester, waterproof membraned shells, and very lightweight technical fabrics need extra care with heat settings or a sew-on approach to avoid fabric distortion or membrane damage.
How long does the production process take?
Standard production runs typically complete within 10 to 15 business days from artwork approval. Rush turnaround options are available for time-sensitive orders. Working with a New Zealand-based producer keeps your timeline predictable without the delays that international shipping and customs processing introduce into offshore orders.
Conclusion
Designing your own iron-on patches is a process that rewards preparation at every stage. A bold, well-simplified design in vector format, matched to the right patch type, backed correctly for its intended use, and produced by a team that understands New Zealand conditions, gives you a finished product that looks sharp, bonds firmly, and lasts for years.
Embroidery Patches NZ takes your artwork from concept through digitising, proofing, and production with local expertise, fast turnaround, and a digital proof on every order so you always know exactly what you are getting before production begins. Start your design today and put your brand somewhere it stays.