Making a custom iron-on patch from scratch is one of the most satisfying things a New Zealand creator, brand owner, or club organiser can do. The process takes an original idea and turns it into a durable, wearable object that carries real identity across every garment, bag, and kit item it lands on.
The difference between a patch that looks handmade and one that looks professional comes down to materials, technique, and finishing. Custom embroidery patches creators are proud to wear start with the right thread, the right base fabric, and a production process that treats every step with the precision the final product deserves.
Materials to Use for Custom Iron-On Patches
The materials you choose at the start determine how your patch performs across New Zealand’s full range of conditions, from Northland UV summers to South Island winters and everything the outdoors throws at gear in between.
Thread
High-denier polyester thread is the standard for professional embroidery patches and the right choice for the New Zealand environment specifically. Polyester thread resists UV fading far better than rayon, which breaks down and loses colour saturation quickly under New Zealand’s high UV index.
Rayon thread produces a slightly silkier finish and works well for indoor display pieces. For any patch that will see regular outdoor use in New Zealand, polyester is the only sensible choice.
Base Fabric
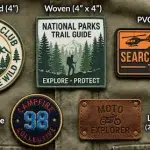
The base fabric gives the patch its body, its surface texture, and its overall feel in the hand. Three options cover most patch applications:
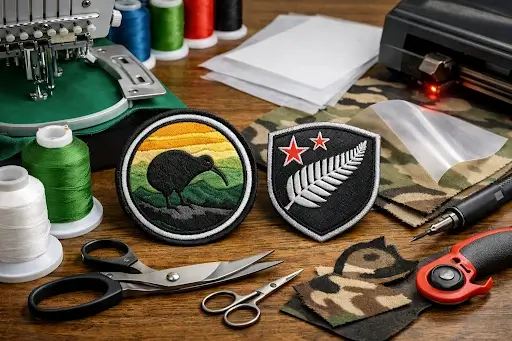
- Twill (Most Versatile, Industry Standard): A tight, diagonal-weave fabric that provides a firm and stable surface for embroidery.
- Felt (Soft, Forgiving, Easy to Finish): Thicker and softer than twill, with a non-fraying structure that simplifies finishing. Commonly used for school badges, community patches, and decorative applications where texture matters.
- Camouflage Fabric (Niche, Aesthetic-Driven Choice): Designed for outdoor and tactical use, blending into rugged environments. Balances visual identity with functional aesthetics, allowing embroidery to stand out while matching gear.
Heat-Seal Backing Film
The iron-on layer is a thermoplastic adhesive film that gets laminated to the back of the finished embroidery. When activated by heat between 160 and 180 degrees Celsius, the film bonds to fabric fibres and creates a secure, washable attachment.
Film weight varies, heavier film for thicker fabrics, lighter film for standard apparel. Using the wrong film weight for your base fabric is one of the most common causes of early edge lifting on DIY iron-on patches.
Step-by-Step DIY Guide: Creating Your First Patch
Step 1: Digitising Your Artwork
Embroidery machines do not read image files. They read stitch files, and converting your artwork into a stitch file is the process called digitising. A digitiser takes your vector artwork and maps out every stitch path, stitch type, stitch direction, colour sequence, and density setting the machine needs to reproduce your design accurately in thread.
The two most widely supported stitch file formats are DST, which works across most commercial embroidery machine brands, and PES, which is specific to Brother embroidery machines. Always confirm which format your machine or production partner requires before digitising begins.
Step 2: Hooping and Stitching
Hooping is the process of securing your base fabric into the embroidery machine’s frame before stitching begins. The fabric must sit flat, evenly tensioned, and completely stable in the hoop. Any slack or misalignment in the hoop causes the design to stitch out of registration, meaning colour sections do not align correctly with each other.
Place a cut-away or tear-away stabiliser behind the base fabric before hooping. The stabiliser supports the fabric during stitching, prevents distortion under the tension of the embroidery thread, and keeps the finished patch flat rather than puckered. Cut-away stabiliser stays permanently attached to the back of the patch. Tear-away stabiliser gets removed after stitching is complete.
Step 3: Applying the Iron-On Backing Layer
Once stitching is complete and the stabiliser is trimmed or removed, the heat-seal backing film gets laminated to the back of the embroidery. Cut the film to match the patch dimensions. Place it adhesive-side down against the back of the embroidery. Cover with a pressing cloth and apply a dry iron at 150 degrees Celsius for 10 to 15 seconds with firm, even pressure.
Do not overheat the film during lamination. The goal at this stage is to tack the film in place against the back of the embroidery, not to fully activate the adhesive. Full activation happens when the end user applies the patch to their garment. Overheating during production partially activates the adhesive and reduces its bonding strength at the application stage.
Precision Finishing: Laser Cutting vs Manual Trimming
How you cut the finished patch determines the quality and consistency of the final edge. Both methods work, but they deliver different results across different production volumes and patch shapes.
| Feature | Laser Cutting | Manual Trimming |
| Edge Quality | Sealed, fray-proof, perfectly consistent | Variable, depends on scissors and operator skill |
| Speed | Fast across full batch in one pass | Slow, each patch trimmed individually |
| Complex Shapes | Handles any outline with full accuracy | Difficult on tight curves and re-entrant angles |
| Fraying Risk | None, heat seals the edge instantly | Present on unbacked or non-merrowed edges |
| Best For | Production runs, wholesale, retail-ready batches | Single pieces, simple shapes, home DIY |
| Equipment Needed | Laser cutter | Duckbill scissors, fine-tip scissors, cutting mat |
FAQs
Can I iron custom patches onto technical outdoor gear?
For standard outdoor fabrics including canvas, cotton, and polyester shell materials, iron-on backing performs well with the correct heat settings. For waterproof membraned fabrics like Gore-Tex and similar laminate constructions, iron heat risks damaging the waterproof membrane layer.
How do I wash a garment with an iron-on patch?
Turn the garment inside out before placing it in the machine. Wash on a cold cycle only. Hot water reactivates the thermoplastic adhesive and then re-cools it during the cycle, which breaks down the bond over repeated washes.
Does Embroidery Patches NZ offer digitising services?
Yes. Embroidery Patches NZ provides full digitising support on every order. Whether you are working from a hand-drawn sketch, a finished vector file, or an existing logo, the digitising team converts your artwork into a production-ready stitch file that reproduces your design accurately in thread at your specified patch size.
Get a Professional Finish with Embroidery Patches NZ
The DIY process teaches you exactly how much work goes into a retail-ready patch. Embroidery Patches NZ handles every step, from digitising and stitching through to laser cutting and heat-seal backing, so your finished patches arrive ready to apply, ready to sell, and ready to wear. Get a free quote for custom embroidery patches NZ today and put your design into production without the hassle.