Whether you are repairing a well-loved denim jacket picked up at an op shop in Ponsonby, personalising your kid’s school bag for the new term, or getting your sports club’s logo stitched onto fifty training tops iron on patches are one of the quickest and most satisfying ways to customise fabric in Aotearoa.
The idea is simple enough: a design backed with heat-activated adhesive that bonds to fabric when pressed. But between choosing the right patch type, knowing which fabrics can handle the heat, and getting the application right the first time, there is more to it than most people expect.
This guide covers everything. From how iron on patches actually work and which types are available in New Zealand, through to a full fabric temperature reference, a step-by-step application walkthrough, and how to order custom iron on patches in NZ for your team, brand, or creative project. Jump to the section you need using the contents above, or read through from the top.
What Are Iron On Patches?
An iron on patch is a piece of embroidered, woven, printed, or moulded material with a layer of thermoplastic adhesive on its reverse side. Apply heat and firm pressure using a household iron, and that adhesive melts into the fibres of the garment beneath creating a firm bond without a single stitch.
The format has been around since the 1960s, when iron on letters and numbers became standard for personalising sports uniforms. The underlying principle has not changed, but the range of materials, finishes, and applications has expanded considerably. Today, iron on patches appear on everything from embroidered rugby club crests on training tops across Hamilton and Palmerston North, to woven name tags on hospitality workwear in Auckland’s Viaduct Harbour precinct.
What makes iron on patches so practical is the combination of speed, affordability, and no specialist tools required. A correctly applied patch takes under two minutes. That qualifier correctly applied is what this guide is here to help with. Getting the technique right is the difference between a patch that survives fifty washes and one that peels at the corner after the first cycle.
Types of Iron On Patches Available in NZ
The heat-activated adhesive backing is consistent across all iron on patches. What varies is the face material and that determines the look, the durability, and the right application for your project.
Embroidered Iron On Patches
The most widely ordered type in New Zealand. Embroidered patches are built from layered stitched thread on a twill base, giving them a raised, textured appearance with strong visual depth. They hold up exceptionally well through regular washing and physical wear.
Best for: club logos, military and morale patches, jacket back patches, school crests, sports team identification.
Detail level: Medium text under 6mm in height tends to lose legibility at the stitch count required.
Woven Iron On Patches
Woven patches use high-density threads woven flat rather than stitched in relief, similar in structure to a woven luggage label. The result is a smooth, highly detailed surface that renders fine text and intricate logos far more accurately than embroidery can at smaller sizes.
Best for: name tags, brand logos with fine lettering, precise artwork that needs to stay sharp at small sizes.
Detail level: Very high the preferred choice when embroidered stitching would cause detail to fill in or blur.
PVC / Rubber Iron On Patches
Moulded PVC patches with a heat-transfer backing. Waterproof, UV-stable, and extremely durable, popular with New Zealand’s outdoor and military communities, and increasingly common on adventure-brand gear from Queenstown outfitters to Fiordland expedition kits.
Best for: morale patches, tactical gear, outdoor equipment bags, waterproof applications.
Note: PVC patches benefit from edge stitching after heat application, as the rigid material applies stress to the adhesive border during movement.
Sublimated Iron On Patches
Sublimation printing allows full-colour, photo-realistic designs to be reproduced on patch fabric with no colour limits, no stitch count constraints, and no minimum colour separation. The design is dye-printed directly into the fabric surface.
Best for: detailed photography-based artwork, gradient designs, complex multicolour branding.
Limitation: slightly less surface durability under abrasion compared to embroidered options, and colours can fade faster under extended direct UV exposure relevant in the NZ summer context.
Chenille Iron On Patches
Thick, looped chenille fibres give these patches their distinctive soft, textured appearance. Highly popular in NZ secondary schools, varsity sports teams, and streetwear circles you have likely seen them on leavers’ jackets at prizegiving evenings or on the sleeves of Rhythm and Vines festival gear.
Best for: varsity letters, sports club awards, leavers’ jackets, streetwear and fashion applications.
Note: chenille requires careful application, lower heat and a thick pressing cloth to protect the pile.
Appliqué Iron On Patches
Appliqué patches layer one piece of fabric over another, with the border secured by embroidery stitching. They have a flat, graphic quality suited to bold designs and larger patches where a single embroidered panel would be heavy.
Best for: large decorative patches, statement back panels, costume and theatre work.
Iron On Patch Types: NZ Comparison
| Patch Type | Material | Detail Level | Wash Durability | Best For |
| Embroidered | Thread on twill | Medium | High | Club logos, crests, morale patches |
| Woven | High-density woven thread | Very High | High | Name tags, fine text logos |
| PVC / Rubber | Moulded PVC | High (3D) | Very High | Tactical, outdoor, waterproof |
| Sublimated | Dye on polyester fabric | Very High (photo) | Medium | Full-colour artwork, gradients |
| Chenille | Loop-pile chenille | Low–Medium | Medium | Varsity letters, awards, streetwear |
| Appliqué | Layered fabric + embroidery | Medium | High | Large decorative panels |
Pricing is indicative for custom orders in New Zealand and varies by quantity, size, and complexity.
Iron On Patches Fabric Compatibility Guide
This is the section most people skip then regret. The adhesive on an iron on patch needs sufficient heat to activate, and a fabric with enough fibre density and texture for the bond to grip. Some fabrics cannot handle the temperature required, and applying heat to them causes permanent, irreversible damage.
New Zealand’s seasonal wardrobe adds some practical considerations. Winter merino base layers and polar fleece mid-layers are common but genuinely challenging fabrics. Cotton denim, canvas, and cotton-blend fabrics the ideal candidates are worn year-round and fortunately make up the majority of garments people want to patch.
If you are ever unsure, test on a hidden seam first. A few seconds of heat on an inner hem costs nothing if it goes wrong.
Fabric Compatibility and Recommended Iron Temperature
| Fabric | Iron Temp | Compatible? | Practical Notes |
| Cotton | 180–200°C | Yes | Best fabric for iron on patches bonds reliably and holds through washing |
| Denim | 180–200°C | Yes | Ideal thick, dense weave grips adhesive firmly |
| Canvas | 180–200°C | Yes | Excellent for bags, totes, and heavy outerwear panels |
| Linen | 180–200°C | Yes | Works well use a pressing cloth to protect the weave |
| Polyester (light) | 120–140°C | Caution | Lower temp required; adhesive bond is weaker; always finish with stitching |
| Polyester blend | 130–150°C | Caution | Test on a hidden seam; risk of glazing at higher temperatures |
| Wool / Merino | 140–160°C | Caution | Use a damp pressing cloth; never introduce steam directly to the adhesive |
| Nylon | Not recommended | No | Melts and distorts at patch application temperatures |
| Fleece / Polar fleece | Not recommended | No | Uneven pile surface prevents reliable adhesive bond; melting risk |
| Faux leather / PU | 100–120°C | Caution | Brief press only; follow up with stitching immediately |
| Waterproof shell (Gore-Tex, etc.) | Not recommended | No | Heat compromises the waterproof membrane and may void the garment warranty |
A note on NZ winter gear: Many mid- and outer-layer garments sold through NZ retailers particularly softshells and hardshells used for tramping and skiing contain waterproof or breathable membranes that heat will permanently damage. For technical outerwear, sew-on or velcro-backed patches are the correct solution. Patches are not worth more than your Icebreaker jacket.
|
How to Iron On a Patch: Step-by-Step
Getting this right is about preparation and pressure. The most common reason patches fail peel at the edges, lift mid-panel, or fall off after one wash is insufficient heat combined with an insufficient press. Here is how to attach embroidered patches and others to garments:
What You Need Before You Start
- A household iron with steam switched off
- A firm, hard ironing surface a standard ironing board works if the padding is firm, but a cotton towel folded four times on a hard table surface is better
- A thin cotton pressing cloth or a clean pillowcase
- The patch, positioned exactly where you want it before any heat touches it
- A timer
Step-by-Step Application Instructions
Step 1 — Wash and dry the garment first.
New fabric and fabric washed with liquid fabric softener often has a coating on the fibres that reduces adhesive grip. Wash the garment without conditioner and dry it completely before patching.
Step 2 — Set the iron temperature and turn off steam.
Select the appropriate temperature for your fabric (see the compatibility table above). For cotton and denim, the cotton/linen iron setting is correct. Allow the iron to reach full temperature approximately two minutes from switching on.
Step 3 — Pre-heat the application area.
Before placing the patch, press the iron on the bare fabric surface for ten seconds. This removes residual moisture from the weave and pre-heats the fibres, which improves adhesion.
Step 4 — Position the patch.
Place the patch design-side up exactly where you want it. Take the time to get this right repositioning after heat application causes adhesive smearing.
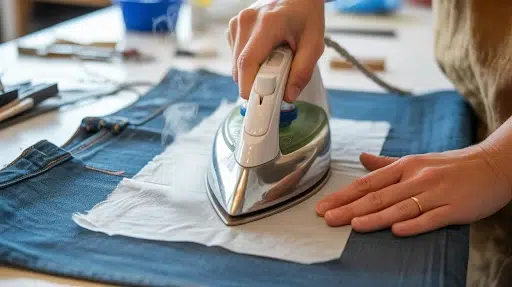
Step 5 — Cover with the pressing cloth.
Lay the pressing cloth over the patch. This protects the patch face from direct iron contact and distributes heat more evenly across the patch surface.
Step 6 — Press firmly. Do not slide.
Apply firm, even downward pressure on the iron for 25–30 seconds. Press in one position and do not slide or rock the iron. Put your weight into it. A light touch is the most common cause of failed application.
Step 7 — Flip and press from the reverse side.
This step is what most guides leave out. Flip the garment over so the patch is face-down against the ironing surface. Press firmly from the inside of the garment for another 20 seconds. This activates the adhesive from both directions and creates a significantly stronger bond.
Step 8 — Allow to cool before handling.
Leave the garment undisturbed for at least 60 seconds while the adhesive sets. Handling warm adhesive before it has set will lift the patch.
Step 9 — Test the edges.
Once cool, press each edge with a fingertip. Any edge that lifts should be re-pressed immediately: press cloth on, 20 seconds, firm pressure, cool again.
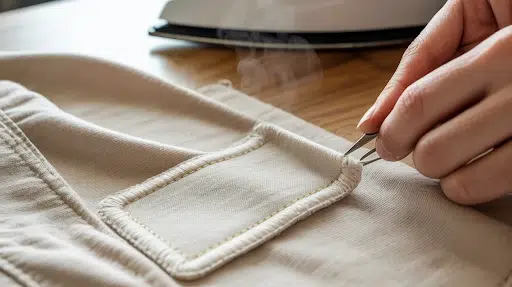
How to Secure the Edges for Long-Lasting Adhesion
For patches on items that get heavy use school bags, sports kit, workwear a basic line of stitching around the perimeter extends patch life through many more wash cycles. You do not need a sewing machine.
A simple backstitch by hand around the border takes five minutes and effectively makes the patch permanent. For anyone working on bulk uniform patches for a sports club or school, a straight-stitch pass on a domestic sewing machine takes seconds per patch.
Common Mistakes and How to Avoid Them
- Using steam: Moisture actively interferes with the adhesive bond. Steam off, always.
- Soft or padded ironing surface: A soft surface absorbs the downward pressure rather than transmitting it to the patch. Use a firm surface.
- Pressing for too short a time: Ten seconds is not enough. 25–30 seconds, firm pressure, still iron.
- Skipping the reverse-side press: This single additional step is the most reliable predictor of whether a patch stays put long-term.
- Applying to damp fabric: Even slightly damp fabric traps moisture under the patch and prevents proper adhesion. The garment must be completely dry.
Iron On Patches vs Sew On Patches — Which Should You Choose?
Both methods are genuinely useful. The right choice depends on the garment material, the use case, and how permanent you need the result.
Iron On vs Sew On vs Velcro: Full Comparison
| Method | Permanence | Skill Required | Wash Durability | Best For | Not Ideal For |
| Iron on | Medium–High | None | Good (with care) | Casual wear, fashion, quick personalisation | Heavy workwear, nylon, fleece |
| Sew on | Very High | Basic stitching | Excellent | Uniforms, jackets, tactical gear, long-term use | Delicate or very fine fabrics |
| Iron on + sew edges | Very High | Basic stitching | Excellent | All-purpose; combines speed with durability | Nothing this is the recommended approach |
| Velcro backed | Fully removable | None | Good | Gear that changes; children’s uniforms | Permanent branding |
| Fabric glue | Low | None | Poor | Temporary craft projects only | Any regularly washed garment |
For NZ school uniforms, the iron on and edge-stitch combination is the most practical approach: fast to apply, reliable through the school year, and reversible if a patch needs to be transferred to the next sibling’s jersey.
For motorcycle club patches or any garment going through commercial laundry common in NZ hospitality, healthcare, and aged care sew on is the only reliably durable method.
How Long Do Iron On Patches Last?
Applied correctly to a compatible fabric, an iron on patch will survive 30–50 wash cycles before any edge-lifting begins. With edge stitching added, the patch will outlast the garment in most cases.
The main factors that shorten patch life:
High dryer heat.
New Zealand’s long daylight hours and reliable westerlies make line drying practical for most of the year ideal for patched garments. If you use a tumble dryer, low heat only. The same thermoplastic adhesive that bonds at iron temperature softens and releases over repeated high-heat drying cycles.
Fabric softener.
Liquid softener coats fibres with a thin lubricating layer that weakens adhesive grip over time. Wash patched garments without fabric softener, or switch to wool dryer balls.
Hot wash cycles.
Cold water or 30°C on a gentle cycle is best for any garment with iron on patches. The 60°C cycles used for heavily soiled workwear accelerate adhesive breakdown.
Ignoring early edge lift.
A lifting edge that gets left alone becomes a peeling corner, which becomes full detachment within a few more washes. Re-press any lifting edge immediately five seconds at iron temperature and firm pressure will re-activate the adhesive and reseal it.
Washing care for patched garments:
- Turn inside out before placing in the machine
- Cold wash or 30°C, gentle cycle
- No liquid fabric softener
- Line dry in the shade where practical NZ summer UV is harsh, and extended direct sun exposure gradually fades patch colours, particularly on sublimated patches
- Tumble dry on low heat only if necessary
How to Remove Iron On Patches Without Damaging Fabric
Patch placement goes wrong. Club branding changes. A school uniform gets passed down. Iron on patches are not permanent in the way stitching is the adhesive can be softened and reversed. And this is how to remove iron on patches:
Alt text: How to remove iron on patch from cotton fabric without damage NZ, peeling corner after heat
The Heat Reversal Method
Set your iron to the same temperature used for application. Place a pressing cloth over the patch and press for 15–20 seconds to fully soften the adhesive. While the fabric is still warm, use flat-nosed tweezers or a flat blunt tool to slowly peel the patch from one corner. Work steadily across the patch pulling too quickly risks tearing the base fabric. If the patch cools and resistance increases, re-heat and continue.
Removing Residual Adhesive
After removal, a faint adhesive residue typically remains on the fabric. Apply a small amount of isopropyl rubbing alcohol (available at most NZ pharmacies and medical suppliers) to a cotton ball and rub gently over the residue in one direction. Test for colour fastness on a hidden seam before treating visible fabric.
An alternative widely available in New Zealand is lighter fluid (naphtha), which dissolves most thermoplastic adhesives without damaging cotton. Apply sparingly, work from the outside of the residue inward, and wash the garment thoroughly afterwards.
What not to do: pulling a cold patch off forcefully in one movement is the fastest way to damage your fabric. Always heat first, always peel slowly, and always test solvents on a hidden area before treating the visible surface.
|
Custom Iron On Patches in NZ — How to Design and Order Your Own
There is a significant difference between a generic patch from a retail shelf and a custom iron on patch made to your exact specifications. Custom patches carry your exact logo, your team’s specific colours, your chosen shape, your wording and they are available in New Zealand with production timelines that make even last-minute orders workable.
Choosing the Right Size for Your Iron On Patch
| Application | Recommended Width | Notes |
| Jacket chest / breast pocket | 60–90mm | Standard for corporate and club badge placement |
| Jacket back (full design) | 200–280mm | Statement piece; edge stitching strongly recommended |
| School bag / backpack | 70–100mm | Most NZ school bag panels fit up to 100mm comfortably |
| Cap / structured hat (front panel) | 50–70mm | Cap front panels limit practical width to ~70mm max |
| Hoodie or sweatshirt | 80–120mm | Chest or sleeve placement |
| Name tag / uniform label | 80–120mm wide × 25–40mm tall | Minimum 8mm letter height for text legibility |
| School uniform crest | 60–80mm | Standard NZ school uniform chest badge placement |
| Sports jersey (chest or sleeve) | 50–80mm | Avoid areas subject to significant stretch |
Artwork and Design File Requirements
For embroidered and woven patches, your supplier converts your artwork into an embroidery digitising file. That process works best when you supply:
- Vector artwork: (AI, EPS, or SVG format) this gives the digitiser the cleanest possible starting point and the most faithful colour and shape reproduction
- High-resolution PNG or JPEG: (300dpi minimum) when vector files are unavailable
- Pantone colour references: If accurate colour matching is critical
- A note on fine text: Indicate whether small text needs to remain legible, as this directly affects the minimum workable patch size
At Embroidery Patch NZ, digitising and artwork preparation are included at no extra charge. You do not need to supply a production-ready file, a clear logo or image is enough to start.
How to Order Custom Iron On Patches with Embroidery Patch NZ
Embroidery Patch NZ supplies custom iron on patches across all of New Zealand from Auckland to Invercargill in embroidered, woven, PVC, sublimated, and chenille styles. No minimum order. Free design service. Free shipping on every order.
The process:
- Fill in the Get a Quote form with your patch type, approximate size, and quantity
- Our team prepares a digital proof no commitment at this stage and no artwork charges
- Approve the proof or request changes as many revisions as you need
- Production and delivery typically 10–14 business days for standard orders, with rush options available
|
Iron On Patches for Specific Uses in New Zealand
Iron On Patches for Jackets and Hoodies
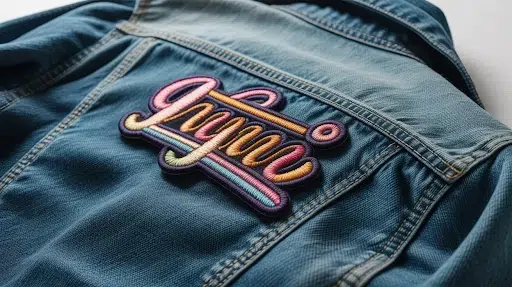
Denim jackets and cotton-faced hoodies are among the most reliable surfaces for iron on patches. The dense weave grips the adhesive firmly, and both materials handle the required iron temperatures without issue.
For jacket back patches large designs covering most of the back panel edge stitching after heat application is not optional. The sheer weight and surface area of a large patch places mechanical stress on the adhesive bond that stitching handles far more reliably.
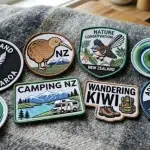
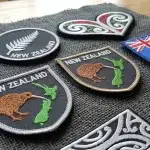
In New Zealand, personalised denim jackets with custom patches have become a consistent choice for school leavers’ jackets, festival gear at events like Laneway Auckland and Rhythm and Vines in Gisborne, and motorcycle clubs from Northland to Southland.
Iron On Patches for School Bags and Uniforms
School bag patches are one of the most practical applications in the NZ context fast to apply, harder to remove by a curious ten-year-old, and far more reliable than iron-on label tape. For name identification on bags and PE kit, a custom woven iron on patch in the school’s house colours or with a student’s name will survive the full school year without reapplication.
The back-to-school period in New Zealand January and early February is peak season for school bags and uniform patches. Ordering custom patches in December avoids the production rush and ensures delivery well before term starts.
Iron On Patches for Rugby Clubs and Sports Teams
Club-branded iron on patches are practical and economical for NZ community sports organisations. They identify players by name, number, or club affiliation on training kit without the cost of fully custom-embroidered jerseys.
For community rugby clubs, netball teams, and school sports programmes working with tight budgets, iron on patches on standard training tops represent a meaningful cost saving at the start of each season.
For jersey fabrics typically polyester or polyester/spandex blends use a lower iron temperature (130–150°C) and finish with stitching to ensure the patch stays put through tackles, stretching, and weekly washing.
|
Iron On Patches for Workwear and Corporate Uniforms
Custom iron on logo patches are used across New Zealand’s hospitality, trades, retail, and emergency services sectors to brand standard workwear without the lead time or minimum order quantities associated with fully embroidered garments.
An embroidered or woven iron on patch carrying a company logo applies to a purchased work shirt in minutes, giving consistent branded presentation without committing to a single supplier or garment style.
For workwear going through commercial laundry common in NZ healthcare, aged care, hotel linen services, and food processing the patch should always be edge-stitched after heat application. The high-temperature commercial wash cycles and tumble-dry heat used in these environments will loosen iron-only adhesion over time.
Iron On Patches for Hats and Caps
Applying an iron on patch to a curved surface requires a simple adjustment. Place a hard, curved object inside the cap, a rounded jar, a small bowl, or a dedicated hat-blocking form to create a firm, slightly curved pressing surface. Press in short sections of 10–15 seconds each rather than one continuous press, repositioning the cap between sections.
Structured caps with a firm interfaced front panel take iron on patches reliably. Unstructured caps and soft beanies are unreliable candidates; the fabric shifts under pressure and the bond is uneven. For headwear applications, sew-on or velcro-backed patches are generally the more dependable choice.
Iron On Name Patches and Letter Patches NZ
Iron on name patches, a woven or embroidered label bearing a person’s name are one of the most commonly ordered custom patch types in New Zealand. Schools, aged care facilities, hospitality businesses, and sports clubs all use them to identify staff and students clearly without permanent embroidery on each individual garment.
Iron on letter patches (individual alphabet characters) remain popular for personalising bags and jackets. They are available from Lincraft and The Warehouse in basic styles, or as fully custom sets with your specified font, colour, and size from a patch maker. Custom letter patches on a school bag are a practical alternative to sew-in labels that children lose within three weeks of term starting.
Where to Buy Iron On Patches in New Zealand
Your options in NZ fall broadly into three categories: retail stores for generic pre-made patches, online marketplaces, and custom NZ patch makers.
Retail Stores — Generic Patches:
Kmart NZ and Lincraft carry small selections of iron on patches, basic shapes, decorative motifs, letter sets, and repair patches. These work well for quick repairs and general craft projects. Selection is limited and there is no customisation available.
Online Marketplaces:
TradeMe lists occasional iron on patches, mostly from resellers. International platforms shipping to NZ including from China via AliExpress offer larger ranges at lower price points, though quality is highly variable, lead times can reach four to six weeks, and GST applies at the border for commercial quantities.
Custom NZ Patch Makers:
For branded, team, or personalised iron on patches, a specialist NZ supplier gives you control over every variable design, material, size, shape, and finish with lead times of 10–14 days versus three to six weeks from offshore. Quality is consistent and there is someone to contact if anything is wrong.
Embroidery Patch NZ supplies custom iron on patches to clients across New Zealand with free shipping on all orders, no minimum quantity, and an in-house design team that prepares your artwork at no charge. Order custom iron on patches online or request a quote.
Frequently Asked Questions
Are iron on patches permanent?
Iron on patches are semi-permanent. The heat-activated adhesive bonds firmly to compatible fabric and lasts through many wash cycles when applied correctly. The bond can be softened and reversed with heat, making removal possible without destroying the fabric. For applications where permanent attachment is required motorcycle jackets, workwear, uniforms in commercial laundry edge stitching after heat application is the recommended practice.
Can you iron on patches to polyester?
Yes, with care. Use a lower iron temperature (120–140°C) and test on a hidden area of the garment first. The adhesive bond on polyester is weaker than on natural fibres, so stitching the patch edges afterwards is particularly important for polyester sportswear and jersey fabrics.
Do iron on patches come off in the wash?
A properly applied patch on a compatible fabric survives 30–50 wash cycles before any edge lifting begins. The key variables are: correct iron temperature, full 25–30 second press time, reverse-side pressing, cold wash only, no fabric softener, and low-heat drying. Insufficient press time at application is the most common cause of early detachment.
What temperature should the iron be for iron on patches?
For cotton and denim the most common NZ garment fabrics set the iron to 180–200°C with steam off. For polyester or blended fabrics, reduce to 120–150°C. Check the fabric care label before applying heat and when in doubt, test on a hidden seam first.
Can you iron on patches without a pressing cloth?
You can press directly onto the patch back for most embroidered patches. A pressing cloth is still recommended practice it protects the patch face, distributes heat evenly, and is essential for PVC and sublimated patches where direct iron contact will cause surface damage.
Why won’t my iron on patch stick?
The most common causes: the iron was not at full temperature, press time was too short, the fabric had softener residue or was slightly damp, the application was done on a soft or padded surface rather than a firm one, or the fabric type is not compatible (nylon, fleece, or waterproof shell). Check each variable systematically the adhesive can be re-activated with a fresh press.
Can you reuse iron on patches?
Once a patch has been ironed on, cooled, and bonded, the adhesive layer has been consumed. Removing and reapplying a used patch is unreliable the remaining adhesive is thin and the bond will be weak. For patches that need to be repositionable on children’s sports gear that changes seasons, for example velcro-backed patches are the practical solution.
Can I get custom iron on patches made in NZ with no minimum order?
Yes. Embroidery Patch NZ supplies custom iron on patches with no minimum order quantity and free design service included. Whether you need a single patch or a thousand, the process and pricing structure are the same. → Get a quote here.
How do I make an iron on patch last longer?
Apply at the correct temperature with firm, sustained pressure for the full press time. Press from both sides of the fabric. Stitch the edges after application. Wash inside out on a cold, gentle cycle. No liquid fabric softener. Air dry where possible particularly in NZ summer when line drying is easy or tumble dry on the lowest heat setting.
Are iron on patches suitable for NZ school uniforms?
Yes, particularly for PE kit, school bags, house-colour identification, and sports uniforms. Cotton-blend school shirts and polyester sports tops both accept iron on patches. For items going through high-frequency washing, add edge stitching after application. Many NZ schools use iron on patches for crests, house colours, and sports team identification as a cost-effective alternative to full embroidery on every garment.
Ready to Order Custom Iron On Patches in New Zealand?
Whether you need a single personalised design for a jacket, club patches for the new rugby season, or branded iron on labels for your business workwear, Embroidery Patch NZ handles orders of every size with free design service, no minimum quantity, and free shipping across Aotearoa.
Get a free quote for custom iron on patches NZ tell us your size, patch type, and idea. A digital proof comes back fast, with no obligation and no artwork charges.